Couch It! Papermaking Tutorial for Embedding Materials

Hand papermaking offers a colorful lexicon full of terms like kiss, hog, and slurry (obviously a favorite of ours). One term that often gets an eyebrow raise is couching (pronounced ‘coo-ching’), the term papermakers use to describe transferring a newly formed sheet of paper from the mould to the felts.
Learn how to seal objects between wet sheets of paper!
(And if you’re just starting out, here’s the Paperslurry basic hand papermaking tutorial.)
Couch comes from the french verb se coucher: to put to bed. What a sweet way to describe the gentle act of laying the wet sheet onto the post. Traditionally, the sheets would be alternated with felt or pellon to prevent the sheets from bonding during the pressing process.
Perhaps you’ve been placing a post into the dryer only to find two sheets unintentionally stuck together—the phone rings and it turns out you didn’t lay down the pellon you could have sworn that you did, and now you’ve got one super thick sheet.
When wet sheets are intentionally couched atop one another, beautiful layering effects can occur. Artists may choose to include additional materials in their paper that relate to their work conceptually. In other applications, laminated sheets can also resemble a watermark because of the varied thickness in the sheet when light is shone through.
The layering process doesn’t end once the sheets are pressed and dried, layered sheets can become wonderful substrates for drawings, collage, and other surface manipulations.
SUPPLIES
Fiber: abaca or kozo work particularly well with this technique since they are strong, translucent fibers
Inclusion materials: handmade paper scraps, fabric, thread, other flat materials
Methyl cellulose
Felts/pellons + a papermaking set-up
Masking tape/graphite pencil
Shaped deckle (optional)

STEP 1: PULL A SHEET OF PAPER & MAKE REGISTRATION MARKS
Pull a sheet of paper, taking extra care to drain the sheet. While you want to ensure there is enough water left in the sheet for a successful couch, too much water in the sheet will cause your base layer to be too cushiony. It will take some practice to find an ideal balance of water and pulp.
REGISTRATION MARKS
When couching the sheet, mark the corners where the mould is touching the felt/pellon. The lines could be marked on the inner or outer edge of the mould. These lines will guide your future couching to align the edges of both sheets.
Registration lines can be marked using masking tape or a graphite pencil. Sharpies may also be used, but will permanently color your felt and may stain/bleed in further uses.
EXPERIMENTATION WITH FIBERS AND THICKNESS
If you’re aiming for a more traditional weight of paper, each sheet may need to be pulled on the thinner side since it will be doubled in some areas. Alternately, you may choose to use a thicker base sheet, like cotton, layered with a translucent fiber.
Some fibers with different drying rates may pull against one another in the drying process, which will cause the paper to curl permanently. If combining experimental fibers, be sure to fully press and dry test sheets to observe drying phenomena.

STEP 2: APPLY METHYL CELLULOSE
Lightly spray or brush on a coat of diluted methyl cellulose. Methyl cellulose is an archival adhesive that interacts neutrally with paper fibers. Since plants with strong cellulose content make the best paper, it’s no wonder this cellulose based adhesive works like a charm!This step ensures sheets adhere to one another and keep your inclusion in place, without yellowing or otherwise damaging your paper.

STEP 3: ADD YOUR MATERIALS TO EMBED
Begin to collage and add in additional materials. Thread, thin fabrics, and handmade paper scraps work particularly well. Dampen the items with water before laying them on the surface using your hands or fine nosed tweezers.
ISSUES TO KEEP IN MIND
During initial testing it is best to use older, worn felts and pellons in case of accidental bleeding or embossing. Papers with water soluble inks will likely bleed during the pressing process and damage your felts and post. Oil based inks (like those used for intaglio or lithography printing) should withstand the water exposure.
Materials that are too thick and solid may also permanently emboss the felts or impress other sheets in the post. Keep in mind the amount of force exerted during the pressing process, if you are working with a hydraulic paper press. For both the sake of your project and press, avoid using any hard materials (stones, wood, etc).
Since multiple couching requires some experimentation, making multiple smaller posts/pressing individual sheets helps isolate any damage.
STEP 4: PULL THE SECOND SHEET OF PAPER
Pull a second sheet of paper. You may choose to alter this sheet in some way, perhaps by intentionally creating vatman’s tears, removing areas, or creating a thin, translucent top sheet. A shaped deckle could also be used to create a different form to layer on your image.
You may choose to skip step 3 and layer different shapes with your shaped deckles for a variety of effects.
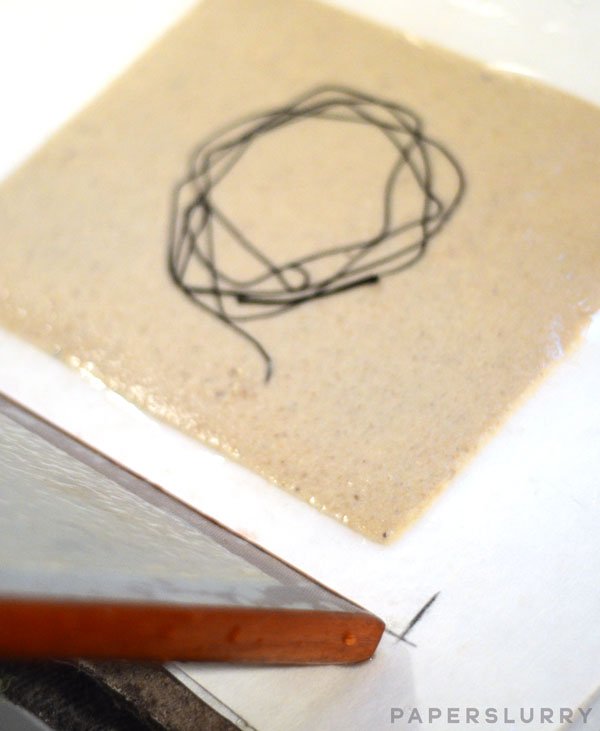
STEP 5: REGISTRATION AND COUCHING
Align the mould with your registration marks and begin to couch your sheet. This may take some practice and extra (albeit gentle) pressure to fully couch the sheet. Remove the mould to reveal your newly layered sheet of paper. The registration marks should help corners of the sheet to align and preserve the traditional deckle edge.
Aligned corners is just one approach to couch multiple layers. Layering sheets at a variety of angles and directions can create some wonderful effects. If your corners have misaligned and their alignment is important to you, you can fudge the corners a bit by adjusting them using a straight edge.

STEP 6: PRESSING YOUR PAPER
Pressing doubled sheets is a delicate process. Since they are wetter and thicker than conventionally couched sheets, it is important to press incrementally and with caution. Pressing too forcefully too soon may cause the sheets to “explode”, or adversely displace pulp all over your felts. In more colloquial terms, your paper may look totally squashed.
Leaving sheets in your press a bit longer than average will also help press out some of that extra water. If the paper still seems too wet to be transferred to a restraint drying system, switching out wet felts for dry felts will help absorb excess water. Gently blotting the sheets with blotters will also remove excess water, especially if your sheet is uneven.
ALTERNATIVE: SPONGE PRESSING
If you plan to air dry your sheet and do not want to use a hydraulic jack papermaking press or screw press to remove water, use a dry sponge to sop up the water from your sheet. In the long run your sheet will be weaker because the hydrogen bonds are not formed with the same level of pressure as a traditional pressing method. However, the dry sponge will remove a surprising amount of water. Swap out dampened sponges for dry ones as you move across the piece.
STEP 7: DRYING THE SHEET
You can dry the handmade papers in a restraint drying system or air dried. Each drying method will offer a distinctive finish for your paper, especially if multiple fibers have been combined. Experiment to see which drying method best suits your needs.If using a restraint dryer, beware of potential blotter embossing. It is best to use older blotters when experimenting.
STEP 8: ADDITIONAL IDEAS


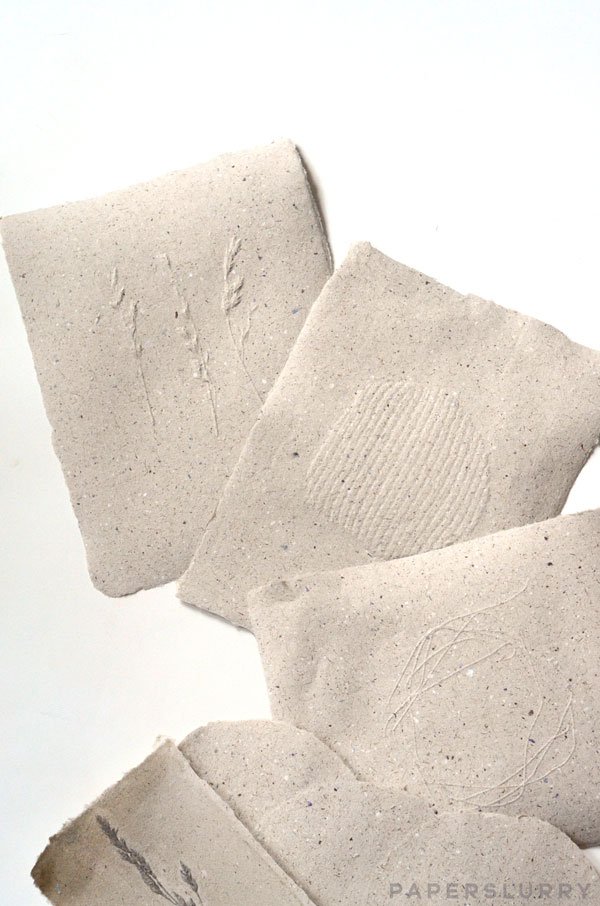
Once your sheets are dry, you can add drawings, text, or further surface manipulations. Perhaps they will become part of a book, a sculptural installation, or an element in a different project entirely. While these papers start out in sheet form, the manipulation possibilities are endless. These works also look wonderful displayed without any additional elements.
Artists using inclusions/embedding in handmade paper:
Anne Marie Kennedy’s plant and textile inclusions show the many possibilities of objects to embed in your handmade papers. The translucent abaca she uses with both clothing and plant materials creates an ethereal presence within the sheet.
During a summer internship, I had the pleasure of assisting in the production of Ann Hamilton’s Paper Chorus at Dieu Donne Papermill. This video demonstrates how studio collaborator Amy Jacobs embedded textiles in the paper.
Check out our interview with Susan Warner Keene where she discusses the layering process in her artwork.