Making Handmade Paper with a Deckle Box (Part 2)

Making handmade paper with a deckle box
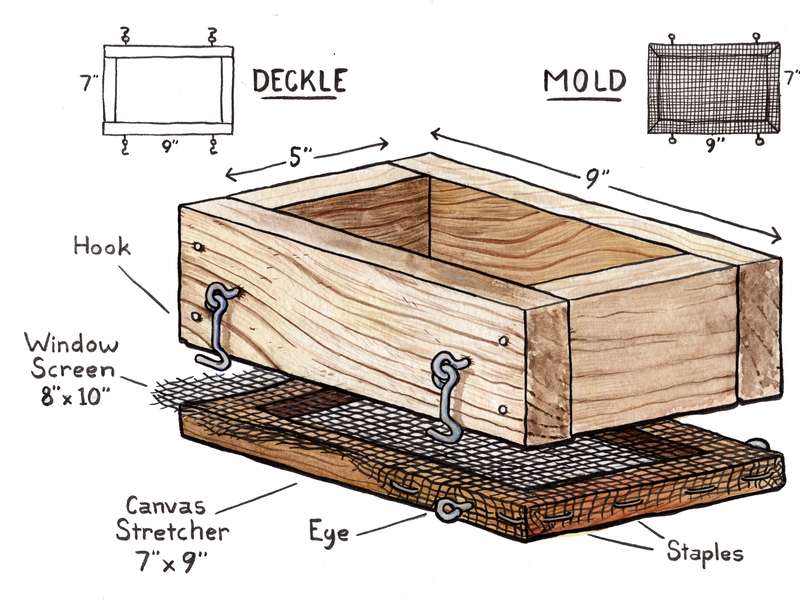
Pull out your papermaking vat and prep your fiber—it’s time to make some handmade paper sheets using your brand new deckle box! If you’re just tuning in, check out our tutorial on how to make your own deckle box.The deckle box can be used to make test sheets, adjust sheet weight, or create unique sheets of handmade paper. While these things can also be achieved with a conventional western mould and deckle, the deckle box allows for a certain level of flexibility, since you can modify a small amount of fiber without contaminating an entire vat. Sometimes you’re one sheet away from completing a project and need the final sheet to be just so—a deckle box is a great way to control all of your variables without committing to a total vat set-up.This tutorial covers two basic approaches to using the deckle box: “the magician’s trick” and a slightly simpler pouring technique.With some creative thinking and experimentation, you’ll find there are plenty of ways to combine these techniques to achieve the results that you’re looking for. Keep a look out for Part 3 of this deckle box series that explores some creative ways to use a deckle box!SUPPLIES
A corrugated plastic deckle box
Heavy duty plastic painters’ tarp
Vat (concrete mixing tub or plastic storage tub)
Hand papermaking set-up (pulp, couching surface, water, pressing & drying method
FIRST STEP: Prep the fiber and papermaking set-up
Prepare the fiber! We recycled and pulped some old sheets of a pigmented blend of cotton and abaca using the techniques discussed here. Even though you might be creating a “one off” experimental sheet, it’s always a good idea to document the recipe. Also be ready with a couching surface, water access, and a surface to put your vat, like in this basic hand papermaking tutorial.
Method A: Deckle box in vat

Hand Papermaking with a deckle box
This pouring technique works well if you need to be particularly mindful of water spillage, since the water is mainly contained in the drainage vat below—landlords and roommates alike will appreciate this approach.
FILL A VAT (many papermakers use concrete mixing tubs found at hardware stores) with a shallow amount of water.
PLACE the mould and deckle box in the water and press down so that there is water on the face of the mould. The mould and deckle will float up if you remove your hand and cause some fiber to leak out, if you don't press down.
USE ONE HAND to keep the mould and deckle box at the bottom of the vat and use the other hand to add more water and pulp to the inside of the deckle box. If there are any clumps here, they will show up in the final sheet
When the interior of the deckle box contains all the pulp, water, and inclusions, AGITATE and then gently lift the mould and deckle box. Move the mould back and forth to arrange the fibers. Also, experiment with formation aid to increase drainage time.
When the sheet has FULLY DRAINED, remove the deckle box and couch the sheet as usual.
Method b: Deckle box + plastic tarp (a.k.a. The Magician’s Trick)

How to make handmade paper with a deckle box - magician's trick
MEASURE OUT A SHEET OF PLASTIC (heavy duty painters’ tarps work especially well) that will, when draped, cover the entirety of the mould and deckle box. Think of laying a pie crust into a pie tin. You’ll want a little bit of extra around the edges, approximately 5 inches on either side. Label this sheet of plastic so that it doesn’t get mixed into the myriad of other ambiguously shaped paper and plastic scraps. Save for reuse.
SET UP A SHALLOW, EMPTY VAT OR UTILITY SINK. This will be used only to catch water that is draining from the mould. Position the mould and deckle box to rest catty corner on the edge of the vat. Lay in the tarp, making sure it creases along the corners.
ADD WATER into the deckle box and make sure it reaches all the way to the edges, creating sharp corners where the plastic tarp meets the deckle box. This insures that there will be an even distribution of pulp over the mould’s surface. This tutorial was designed to create a mid weight test sheet and about forty ounces of water was used. Adjust the tarp so that there is an additional three inch overhang towards one of the near corners of the deckle box. This is where you will eventually grip to pull the tarp out from beneath the pulp.
ADD IN THE PULP, making sure to agitate (mix with hands) the vat thoroughly. If there are any clumps here, they will show up in the final sheet. Unlike the traditional process of dipping into the vat, there is no real way to throw excess pulp off of the mould or shed water. What you’ve added to the deckle box is what you have to work with. It might take some trial, error, and a few spills to figure out the best ratio for the project. The tarp is preventing the pulp from draining through the face of the mould. Now is the time to add any inclusions (threads, paper scraps).
When the vat is well agitated, PULL OUT THE TARP in one fell swoop. The quicker you can expose the entirety of the mould face, the better. The furthest part of the sheet will begin draining as you remove the tarp from the rest of the mould. You’re emulating a magician pulling a tablecloth out from a three course meal with no disruption to the diners.
SHAKE THE VAT side to side to distribute and interweave the fibers. This sheet will take substantially longer to drain than a conventional sheet. If you feel like you need even longer to arrange the sheet, experiment with adding a little bit of formation aid to evenly distribute the fiber. Use sparingly, as this will also affect the weight of the overall sheet. When the surface is no longer glassy, tilt the mould to one corner to drain from the rest of the sheet.
LET THE SHEET DRAIN. When the stream of water has changed to intermittent dripping, you’re ready to couch as usual. Gently apply pressure on the back of the mould and keep in mind that this sheet might be especially spongy.
Final Step: Press and Dry your Deckle Box Papers
Press as you would a normal post in your studio set-up. Either restraint or air drying will work for these sheets, though you may need to exchange blotters if the sheet needs longer than 36 hours to dry to prevent mildew (depending on the drying system and climate). These sheets were hand pressed and dried on glass.
FURTHER READING:
Read Part 3: Creative Papermaking Techniques Using a Deckle Box
Check out this illustration of a wooden deckle box by Francios Vigneaut
Watch these papermakers form a giant sheet of paper using a combination of the “magician’s trick” and skillful maneuvering of the mould.